Getting Started with Your New Device: A Comprehensive Setup Guide
It is always exciting when we get our hands on a new device. You might be an Android user or an Apple lover, but the excitement will be the same. The tricky part starts after buying or getting a new device. How to set up your new device as per your requirements.
Our in-depth guide will equip you with the skills to expertly navigate the setup process, turning your new phone into a customized masterpiece. Get ready to use the full capabilities of your Android device by seamlessly syncing your crucial accounts, personalizing your settings, and installing your preferred apps.
So, put aside any apprehension and welcome the thrill of starting your new Android or iPhone setup. With this guide as your reliable companion for "how do I set my device," you'll confidently steer through the setup steps, akin to a seasoned professional ready to conquer the digital world with your technological expertise.
Key Takeaways
- This guide offers instructions for setting up both Android and iPhone devices.
- Gather necessary items like SIM card, Wi-Fi password, and backup before starting.
- The setup process involves understanding your device, connecting to networks, personalizing settings, and restoring or transferring data.
- Be patient and troubleshoot if you encounter challenges during setup.
- Explore and customize your new device after setup.
- Refer to the guide or user manual for further assistance

Understanding your Device
Before proceeding with the setup, you must understand what kind of device you are dealing with.
Prerequisites for an Android Phone are:
Before initiating the setup process, confirm your previous device's presence and optimal functionality. Additionally, ensure you have your SIM card, Wi-Fi password, and an active internet connection on hand to facilitate the setup of your new Android smartphone.
Verify that your WhatsApp data and photo gallery have been securely backed up using Google Drive.
Utilize Google Drive not only for WhatsApp data and photos but also for safeguarding files like PDFs, essential documents, and media files. Alternatively, you can employ the Google One app for this purpose. Navigate to Settings > System > Backup on your existing device to establish or update your backup data.
It's important to note that Android's built-in backup tool comprehensively covers other data categories such as contacts, messages, call history, app lists, and settings.
Prerequisites for an iPhone are:
To initialize an iPhone, ensure you have the following essentials on hand:
An active internet connection, either via a Wi-Fi network (with the network name and password handy) or cellular data service through a carrier (not applicable for iPhone 14 and later models).
Your Apple ID and corresponding password. If you lack an Apple ID, you can create one during the setup.
Credit or debit card account details if you plan to add a card to Apple Pay during setup.
Your previous iPhone or a backup of your device if data transfer is part of the setup.
Your Android device if you're transferring content from an Android device.
For a seamless setup experience, gathering all the items above before initiating the setup process is advisable. You can set up your new iPhone by connecting it to the internet or linking it to your computer. If your iPhone is under a company's or another organization's administration, consult an administrator for specific setup instructions.
Data transfer to your new iPhone is possible if you possess another iPhone, iPad, or Android device. In cases where storage space is insufficient for a backup, iCloud provides additional space at no cost for a temporary backup, valid for up to three weeks from the iPhone purchase date.
Device-Specific Setup
The next step that we will discuss in detail is the Device setup. Now that we know what is needed for the setup, it will go smoothly.

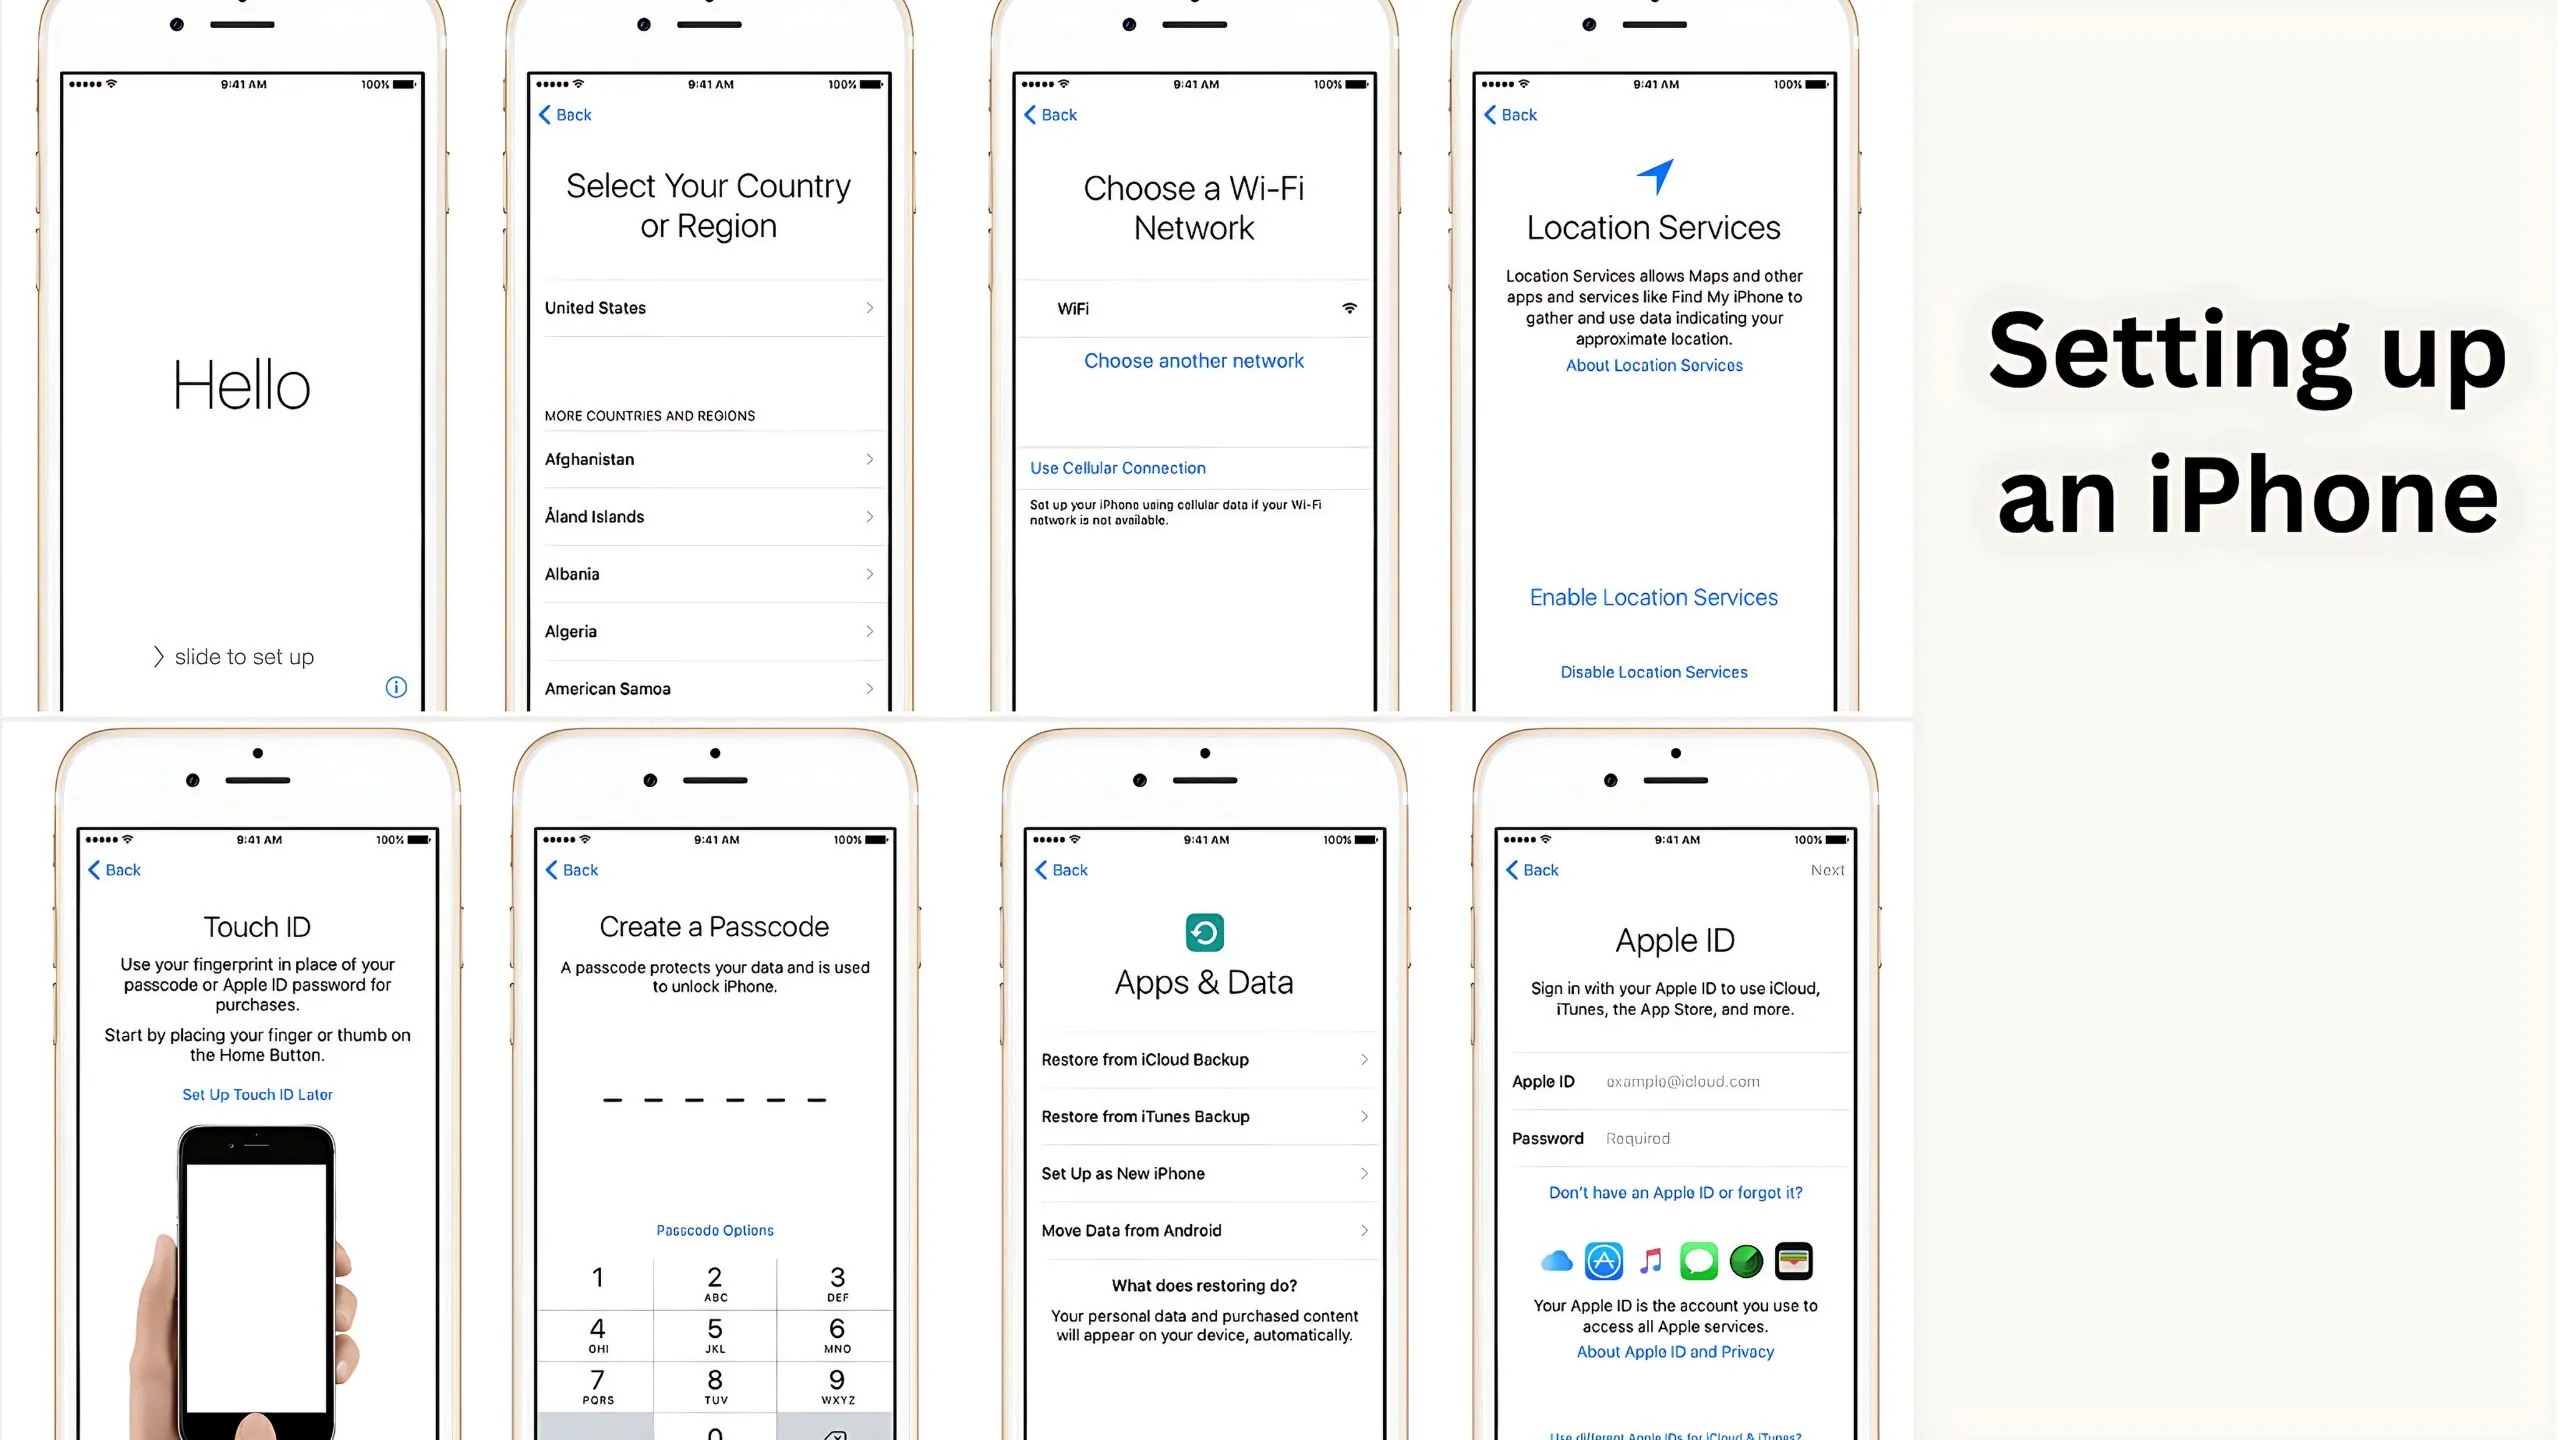
Setting up an iPhone
Activate and configure your iPhone with the following steps:
Press and hold the power button until the Apple logo appears, and then you'll see a multilingual "Hello." Proceed by following the onscreen instructions.
Customize text and icon sizes by selecting Default, Medium, or Large. Slide the icon to your preferred size and tap Continue.
Choosing Setup Method
Utilize Quick Start if you have another device to set up your new one seamlessly. If not, tap Set Up Without Another Device—access Accessibility Options through the blue button.
Connecting to Networks
Connect to a Wi-Fi or cellular network to activate and set up. Choose your Wi-Fi network or Continue Without Wi-Fi for cellular data usage. For iPhones or iPads (Wi-Fi + Cellular), insert the SIM card or eSIM when prompted.
If you are facing connectivity issues, refer to Apple support for assistance.
Personalizing Setup
Select whether the iPhone is for you or a child. Learn about creating a new Apple ID for a child, Family Sharing, and using parental controls.
Securing Your Device
Set up Face ID or Touch ID for device unlocking and purchases. Create a six-digit passcode for added security.
Choose passcode options if you prefer a different format or none at all.
Restoring or Transferring Data
Decide how to restore or transfer data from your old device. Options include iCloud backup, computer backup, or data migration from an Android device.
If no backup or other device is available, select Don't Transfer Apps & Data.
Apple ID Sign-In
Enter your Apple ID email or phone number and password. Recover or create an Apple ID if needed. If using multiple Apple IDs, explore Other Sign-In Options.
Verification may be required from your previous device.
Configuring Additional Features
Enable automatic updates and set up features like Siri, cellular service, and Apple Pay. Complete the setup for services such as Screen Time, which provides insights into device usage and allows setting time limits.
Choose data-sharing preferences with Apple and app developers.
Preview the Light or Dark mode, or set your iPhone to switch automatically between them. Tap Continue when ready to finalize the setup.
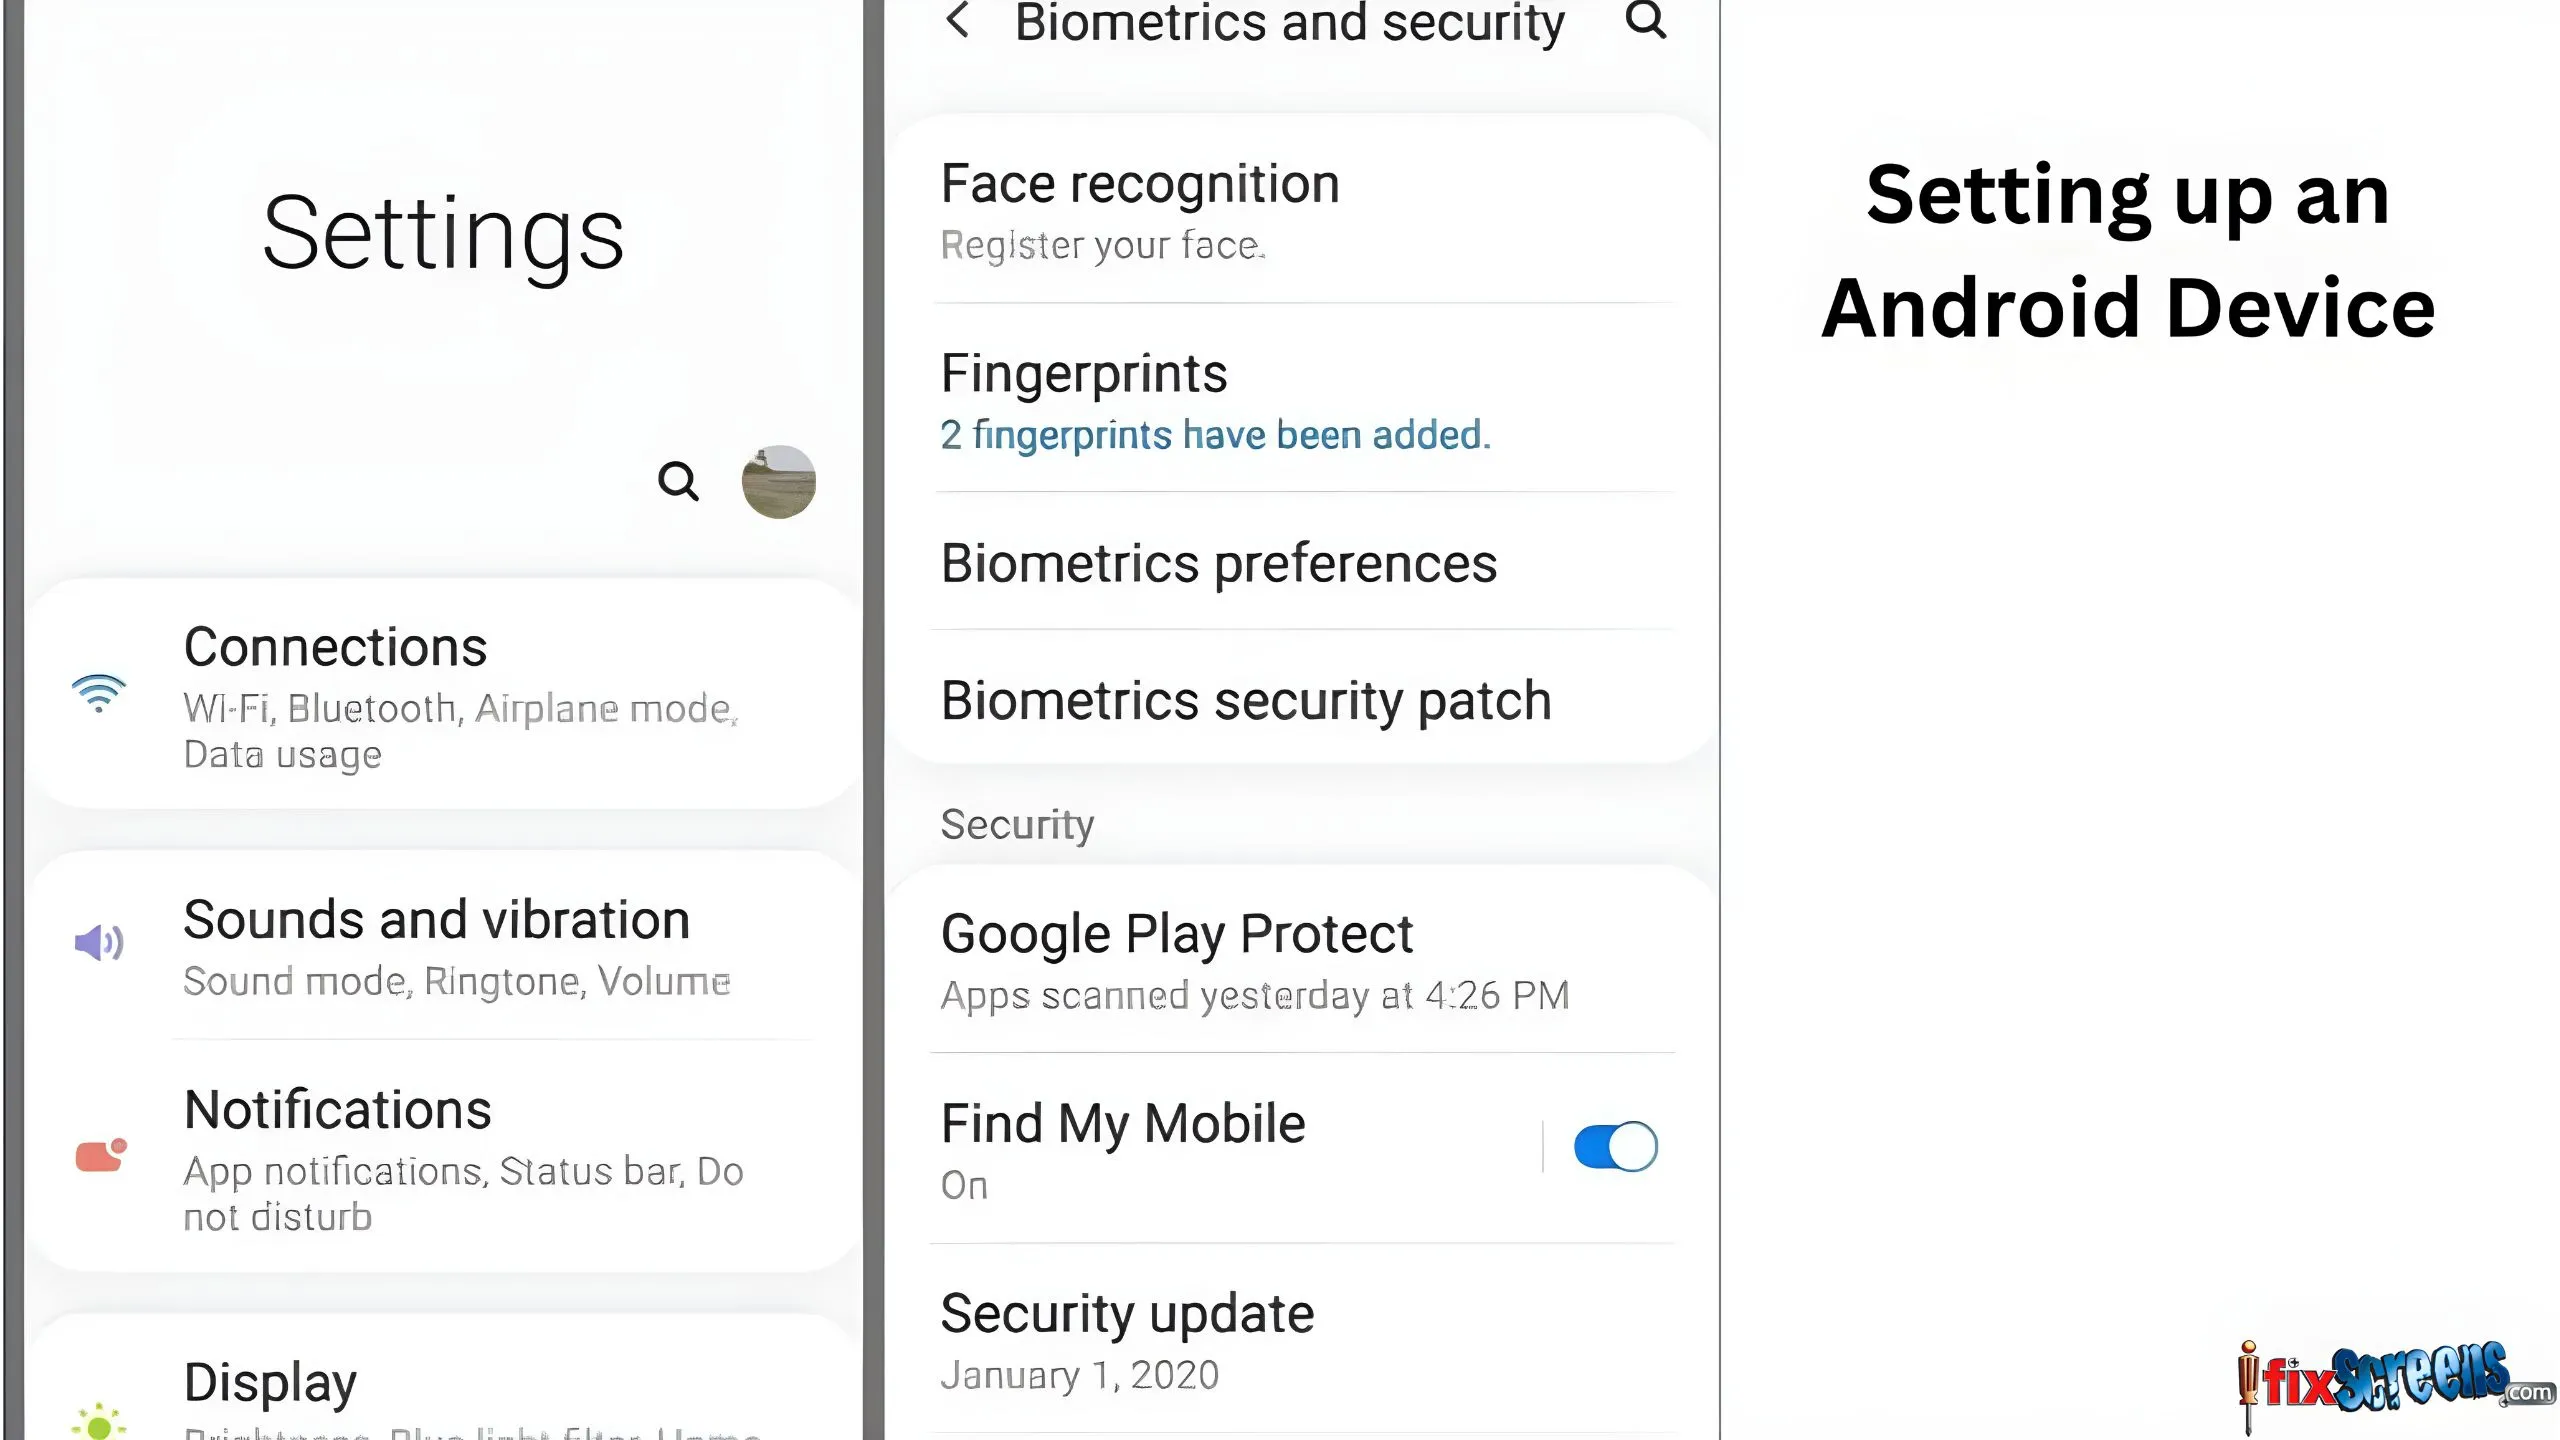
Setting up an Android Device

Starting the Setup Process
Upon turning on your new smartphone, the Welcome screen greets you. Customize text size or brightness by accessing 'Vision settings' according to your preferences.
If English isn't your preferred language, change it before proceeding by selecting the 'English (United States)' option.
Insert your SIM card or opt for eSIM by choosing 'Download a SIM instead?' if applicable. You can also skip this step.
On the subsequent connections screen, restore your device to a Wi-Fi network. If Wi-Fi isn't available, choose 'Set Up Offline' in the bottom left corner.
Wait briefly as the device prepares for the upcoming steps.
Backup and Restoration for Setting Up Your Device
After the waiting period, a screen prompts you to 'Copy apps & data.' Tap 'Next' to transfer data from your old device, or select 'Don't copy' to start afresh.
Connect the old and new devices using a compatible cable, follow onscreen instructions, or choose 'Can't use the old device.'
Sign in with your Google account containing the backed-up data. Ensure the data is backed up from your previous device before proceeding. The device will then download the backup data from the cloud.
Accepting Legal Terms and Signing In
If you used a wired cable method, sign in with your Google account; otherwise, proceed directly to the terms of service page. You can skip signing in, but note that access to certain Google services may be limited. Alternatively, create a new Google account.
Agree to Google's terms of service and customize Google Services settings, turning off unnecessary services. Tap 'Accept' to proceed.
Additional legal terms appear; click hyperlinks to read the Privacy Policy and other agreements, or tap 'I Accept' to move on.
Password Setup & Additional Settings
- Set a PIN for device unlocking or choose alternative password options. You can opt not to lock the device by selecting 'Skip.'
- Follow the instructions to set up fingerprint unlock or choose 'No thanks.' You can set up fingerprint unlock later in settings.
- On the 'Continue setup screen,' choose 'Leave & get reminder' or 'Continue' to complete the Android device setup.
- Set up Google Assistant, Google Pay, and additional device settings.
- On the 'Get tips and tricks' screen, select 'No thanks' or 'Yes, I am in.'
- Choose the dark or light theme option and tap 'Next.'
- Tap 'Try it' to learn navigation gestures or 'Skip' if familiar.
- Swipe on the screen to complete setup; background installation of apps from the previous device begins.
Finalizing the Setup
- Open the notification center and tap 'Finish Pixel Setup.'
- Tap 'Start' to explore options like enabling Google Assistant.
- Select useful options like adding email ID or fingerprint on the' Anything else' screen.
- Uninstall preloaded or obsolete apps.
- Update all applications via the Play Store.
- Check for Android updates in settings > System > System Update.
Final Thought
Your new device is ready once preferences are configured and essential apps are installed. Setting up a phone is a personal journey, so explore and savor every moment. If challenges come, be patient and try troubleshooting for a seamless configuration, which will be according to your preference or liking.
FAQ's
Q: How do I start setting up my new phone?
A: To begin setting up your new phone, turn it on and follow the onscreen prompts to get started.
Q: What guide can help me set up my new Android phone?
A: You can find a step-by-step guide to setting up your new Android phone in the user manual provided by the mobile company or online on their website.
Q: How can I transfer my information from my old phone to the new one?
A: You can transfer your information from your old phone to the new one using a data transfer cable or a cloud-based service offered by the mobile company.
Q: What features should I use when setting up my new phone?
A: When setting up your new phone, you should utilize features such as location services, Wi-Fi, and mobile data to utilize its capabilities thoroughly.
Q: How can I prepare my new phone for use?
A: You can prepare your new phone by charging the battery fully and going to settings to customize the preferences and security settings.
Q: What steps should I follow to set up my new iPhone?
A: To set up your new iPhone, plug it into a power source, turn it on, and follow the step-by-step instructions on the screen.
Q: What can I do if my new phone won't turn on?
A: If your new phone won't turn on, ensure it is charged by plugging it into a power source for at least 20 minutes. Contact the tech support team if it still won't turn on.